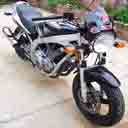
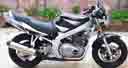
BEFORE AFTER
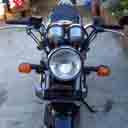
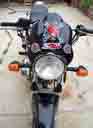
Click on the images above to see the larger versions.
A buddy hooked me up with this screen and the brackets for thirty dollars. To good a deal to pass up even if it was the wrong color. At the bottom of the page I have included the MSRP for everyhing but I bet e-bay could turn up one priced much lower. In fact, I saw one sell for twenty-three dollars this weekend.
The screen install was super easy and took all of ten
minnutes.
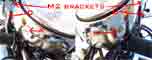
The deal included the M2 mounting hardware but I imagine
some clever work with zip ties would work as well.
Installation
1. Peel off that silly Blast sticker.
2. Attach the M2 brackets to the screen with the four
screws and rubber washers and four rubber covered bolts with a small allen
wrench. (The ones in the stock tool kit will not work. The image below
is of the tool I used.)
![]()
3. Remove the headlight by unscrewing the two (A) and
(B) screws on the under side of the headlight with a philips head screwdriver.
They are located at five and seven o'clock.
4. Wiggle off the headlight from the bucket.
5. Unplug the headlight remembering which side is up.
6. Remove the two bolts marked (C) and (D) on the side of the headlight bucket.
7. Reassemble everything in reverse with the fly screen
bracket holes through the (C) and (D) bolts.

Cutting and Paint prep
I then took a look at it and kept thinking it looked
like the popes hat and that was not what I was hoping for. So I thought
about some fancy airbrushing but decided to saw out some nice c-curves
out of the sides of it.
I used a coping saw for cutting and a dremel for small
grinding and shaping.
I then used a couple of files and spent a lot of time
with the electric finishing sander getting rid of all the saw marks.
I then pulled off the rubber ring from the bottom with
just my fingers and a flat-head screwdriver for the stuborn bits.
Next came a finishing sand all over the screen with six
hundred grit paper.
I then painted with Dupli-Color gloss black and clear
coated the screen.
A week later I sanded and buffed in the shine.
For more details on the
rattle can painting process, I recommend GS
Resources
.
A few stickers from the local auto store and I am done.
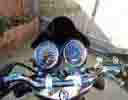
The Final Results

PART NUMBERS
The Screen: M1600.TMAH
Windscreen Kit, Bulls Eye Red
Screen Bolts:M0602.0
Well Nut 8-32
M2 Brackets:M0605.D
Bracket, Windshield, LH, M2
M0604.D
Bracket, Windshield, RH, M2
PABLO LOOKED UP THE M.S.R.P (thanks man)
M1600.TMAH
$59.95
Windshield bracket Right hand
M0604.D
$10.95
Windshield bracket Left hand
M0605.D
$10.95
The following three things came together assembled in
one baggy to attach the screen to brackets:
Well Nut 8-32 -these are the rubber nuts
M0602.0
$1.20/ea (4 needed)
Screw -for nuts above
AN0806.3CBBL
$1.02/ea (4
needed)
Nylon washer
BN0806.6BL
$0.83/ea (4
needed)